Complete Printer Setup & Troubleshooting Guide
Welcome to your complete guide for setting up, connecting, and troubleshooting your printer.
Whether you’re using a Wi-Fi, USB, or WPS setup, this step-by-step guide helps you connect your printer quickly and fix common issues easily.
Printer Wi-Fi Setup (With Display)
Use these steps if your printer has a control panel or display screen.
- Turn on your wireless router and place the printer close to it.
- Keep both devices near each other during setup.
- Plug in the printer’s power cable and switch it on.
- From the printer’s display, press the Menu
- Use the arrow keys to scroll through options.
- Select Network and press OK.
- Choose WLAN, then press OK
- When prompted, open the Setup Wizard.
- Select Yes to enable Wi-Fi.
- Choose your Wi-Fi network from the list.
- Enter your Wi-Fi password and confirm with OK.
- Wait for your printer to connect successfully.
Printer Wi-Fi Setup (Without Display)
- For printers without a display panel, follow these instructions.
- Visit the printer manufacturer’s official website.
- Enter your printer model number and download the correct driver and software package.
- Install the software on your computer.
- Launch the setup wizard and choose Wireless Installation.
- Follow the on-screen steps to start the installation.
- Click Wireless Discovery and select your Wi-Fi network.
- Enter your Wi-Fi password and complete the setup.
- Your printer will now connect to your wireless network automatically.
Connect Printer via WPS (Push Button Method)
- This method works if your printer and router both support WPS.
- Place your printer close to the Wi-Fi router.
- Press the WPS button on the printer.
- Within 2 minutes, press the WPS button on the router.
- Wait until the printer’s light confirms the connection (usually a solid blue light).
Printer Setup Using USB Cable
- Use this option if you want a direct, wired connection.
- Plug in the printer and turn it on, but do not connect the USB cable yet.
- On your computer, go to the official printer support site.
- Download the latest drivers and software package.
- Run the installation and accept the license terms.
- Choose Local Connection (USB) when prompted.
- Connect the USB cable between your computer and printer.
- Follow on-screen steps to complete installation.
- Restart your computer and print a test page to verify.
Installing Printer Drivers
For Windows:
- Make sure your printer is connected to your computer (via Wi-Fi or USB).
- Visit the website of the printer .
- Enter your printer’s model number.
- Download the Full Driver & Software Package.
- Run the installer and follow the on-screen instructions.
- Keep your printer turned on during installation.
- Restart your computer once the setup completes.
- Your printer drivers are now successfully installed and ready for use.
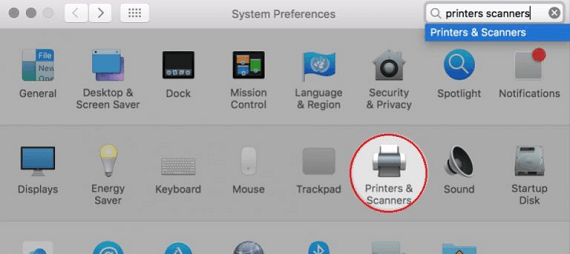
For macOS:
- Locate the downloaded driver file and follow the installation prompts.
- Turn on your printer.
- Click on the Apple Menu → System Preferences → Printers & Scanners.
- Click the + icon to add a new printer.
- Select your printer from the list and click OK.
- Once configuration is done, your printer will be ready to use.
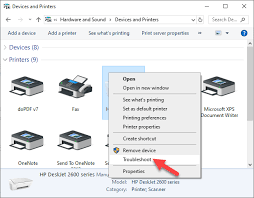
Printer Not Working? Try These Fixes
- Check all connections between your printer and computer.
- If using USB, make sure the cable is properly inserted.
- If using Wi-Fi, confirm that both devices are on the same network.
- Set your printer as the default printer.
- Restart the Print Spooler Service on your computer.
- Update your printer driver from the manufacturer’s official site.
- If issues persist, perform a factory reset on the printer.
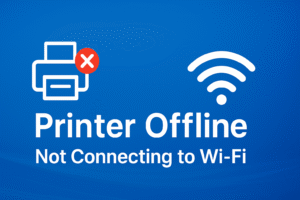
Printer Not Connecting to Wi-Fi?
- Check if your Wi-Fi router supports 2.4 GHz, as most printers do not work on 5 GHz.
- If necessary, split your Wi-Fi into two separate networks (2.4 GHz and 5 GHz).
- Connect your printer to the 2.4 GHz network.
- Double-check your Wi-Fi password.
- Restart both printer and router before reconnecting.
How to Reset Your Printer
- From the printer’s Settings menu, open All Settings or Device Settings.
- Select Initial Setup → Reset.
- Choose the function you want to reset (e.g., Network or All Settings).
- Confirm by pressing OK.
- The printer will restart automatically to complete the reset.
Frequently Asked Questions (FAQs)
Q1. Why is my printer not connecting to Wi-Fi?
Your printer might be out of range, connected to the wrong network, or incompatible with 5 GHz Wi-Fi. Always use the 2.4 GHz network for setup.
Q2. What should I do if my printer shows “Offline”?
Re-add your printer through Windows Settings or restart the print spooler service. Ensure your printer and computer are on the same network.
Q3. Can I install printer drivers without a CD?
Yes. Visit your printer manufacturer’s official website, enter your model number, and download the full driver package directly.
Q4. Why does my printer print slowly?
Slow printing can be caused by high-resolution settings or outdated drivers. Try switching to “Draft Mode” or updating the driver.
Q5. How do I reset my printer to factory settings?
Go to Settings → Initial Setup → Reset → All Settings, then confirm. The printer will reboot and restore default settings.